Today I (Don) wanted to share a little Work In Progress with you all.... the merging of two techniques (hand drawn and digital) to produce a pleasing result.
So the tools I used were:
a sketch pad
a lead pencil
an eraser
a scanner
and photoshop CS6
Below each image I have broadly described each step I took to reach my final portrait.
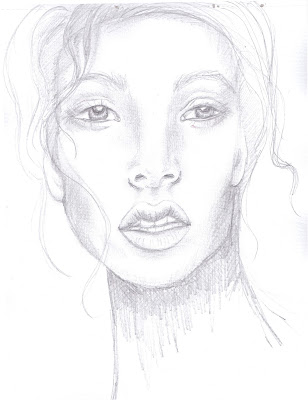
Step 1 ~ Scan Drawing
After scanning the sketch, I adjusted the levels to whiten the background, and rubbed off anything I didn't like for example, pencil smudges and marks.
Step 2 ~ Blend Options
Resize the drawing and centre it on the page, add a new layer below and fill with chosen colour. Change drawing layer to blend mode Linear Burn.
Step 3 ~ Eyes
Select the eyes and copy onto a new layer, turn down the opacity and fill to your liking. I used 31% Opacity and 37% Fill also changed the blend mode to Lighter Colour.
Step 4 ~ Hair
I created a new layer underneath the drawing layer and called it Hair. I then used the polygonal lasso tool to select areas of the hair and used a just off white colour and filled with paint bucket tool. Blend mode I used was Luminosity.
Step 5 ~ Cheeks
I created another layer and called it Cheeks. I used a very soft brush and painted the cheek areas with a red colour #fd414b. Although it was bright, I turned the Opacity down to 18% and the Fill to 58%. Any areas that I didn't like I simply used a very soft eraser brush with low opacity and fill to rub away those areas.
Step 6 ~ Lips
I created another layer and called it Lips. I used the same colour as above, zoomed in and using a soft brush again, I painted in the lip area. I then duplicated that layer 2 more times. Original layer I set to Multiply Opacity 35% Fill 67%, the next lip layer above I set to Multiply as well with Opacity 26% Fill 22%. The last lip layer I set to Multiply Opacity 38% Fill 19%.
Have a play with these options and adjust to what you like, this is just what I liked.
Step 8 ~ Texture
I added a textured paper to the very bottom layer.
Step 9 ~ Highlights
Taking it slightly further, I added hightlights to the lips by creating a new layer above the lip layers. I used a soft bush using the same colour from the hair and painted in the areas on the lips and the eyes that I wanted to add highlights too. I set the blend to Soft Light and left the Opacity and Fill at 100%.
So lovelies, that's the process I used merging both hand drawn and digital techniques.
Have a play yourself, it was fun and totally transformed a light sketch into a really different art piece.


No comments:
Post a Comment
Yay!! Thanks for leaving a comment for us!!